
Recipe Finder Application
In this article we will learn how to create recipe finder application using React and Redux. We will be using API from http://www.recipepuppy.com/.
Application Architecture
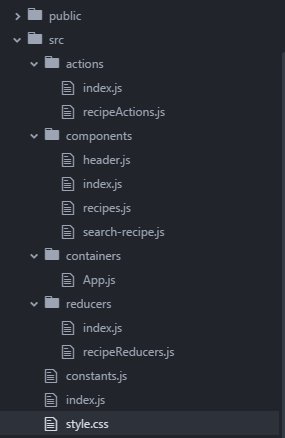
Our application is made up of the following components:
- components
- containers
- actions
- reducers
- store
Let’s look at these components one by one. Lets start with actions.
/src/actions/recipeActions.js
import { UPDATE_RECIPE_NAME, UPDATE_RECIPES } from '../constants';

export function updateRecipeName(recipeName) {
  return {
    'type': UPDATE_RECIPE_NAME,
    'payload': recipeName
  }
}

export function updateRecipes(recipes) {
  return {
    'type': UPDATE_RECIPES,
    'payload': recipes
  }
}
The updateRecipeName action is responsible for passing the recipe name to the reducer, while the updateRecipes action is responsible for passing array of recipes fetched from the API to the reducer.
/src/actions/index.js
import { updateRecipeName, updateRecipes } from './recipeActions';

export { updateRecipeName, updateRecipes }
Here we are simple exporting the functions written in the recipeActions.js file.
/src/reducers/recipeReducers.js
import { UPDATE_RECIPE_NAME, UPDATE_RECIPES } from '../constants';

export function recipeReducers(state = {
    recipeName: '',
    recipes: []
  }, action) {
  switch (action.type) {
    case UPDATE_RECIPE_NAME:
      const recipeName = action.payload;
      return {
        recipeName: recipeName
      }
      break;

    case UPDATE_RECIPES:
      return {
        recipes: action.payload
      }
      break;
    default:
  }
  return state;
}
The recipeReducer function takes in state and action. We have initialized recipeName to an empty string and recipes to an empty array. The UPDATE_RECIPE_NAME case updates the recipeName and the UPDATE_RECIPES case updates the recipes array. Note, that at the end we are returning the state from recipeReducer function.
/src/reducers/index.js
import { combineReducers } from 'redux';
import { recipeReducers } from './recipeReducers';

export default combineReducers({
  recipe: recipeReducers,
});
combineReducers is used to combine more than one reducers, we may have in future. Here we are simply exporting the reducers.
/src/index.js
import React from 'react';
import ReactDOM from 'react-dom';
import App from './containers/App';
import { Provider } from 'react-redux';
import reducers from './reducers/index';
import { createStore } from 'redux';

const store = createStore(reducers);

ReactDOM.render(
  <Provider store={store}>
    <App />
  </Provider>,
  document.getElementById('app')
);
This is the entry point of our application. We create store by passing the reducer to it as a parameter. We have wrapped the entire application inside the Provider and passed store as a prop. Doing so allows the entire application to be able to access store.
Smart and Dumb components
Next we will look at the Smart and Dumb components. Smart components are nothing but containers and dumb components are mere components. Smart components are called smart because they have extra code to connect to store. let’s look at them one by one.
/src/components/header.js
import React from 'react';
import { Navbar, Header, Brand } from 'react-bootstrap';
import '../style.css';

const RecipeHeader = () => (
  <Navbar>
    <Navbar.Header>
      <Navbar.Brand>
        <a href="#">
          <img src="images/recipe-logo.png" id="logo"
  />         Recipe Finder
        </a>
      </Navbar.Brand>
    </Navbar.Header>
  </Navbar>
);

export default RecipeHeader;
The header holds our logo and the project name. This navigation bar has just been copied from react-bootstrap.
/src/components/search-recipe.js
import React, { Component } from 'react';
import { Row, Col } from 'react-bootstrap';
import { Form, FormGroup, FormControl, Button } from 'react-bootstrap';
import '../style.css';

const SearchRecipe = ({handleRecipeNameChange, handleRecipeSubmit}) => (
  <Row>
    <Col md={4} sm={4} xs={4}>
      <FormGroup>
        <FormControl
          type="text"
          name="recipeName"
          onChange={(event) => {
            handleRecipeNameChange(event.target.value)
          }}
          placeholder="Enter recipe name to search"
          className="search-box"
        />
      </FormGroup>
    </Col>
    <Col md={4} sm={4} xs={4}>
      <img
        src="/images/btn-recipes.png"
        className="btn-recipes"
        onClick={() => {
          handleRecipeSubmit()
        }}
      />
    </Col>
  </Row>
);

export default SearchRecipe;
This component has a textbox to accept recipe name from the user and a button to pass the username to the container. I have also styled the component a bit with custom css.
/src/components/recipes.js
import React from 'react';
import { Row, Col } from 'react-bootstrap';
import '../style.css';

const Recipes = ({recipes}) => (
  <Row>
    {
      recipes && recipes.map((recipe, index) => (
        <Row className="recipe-box" key={index}>
          <Col md={2} sm={2} xs={2}>
            {
              recipe.thumbnail === "" ? <a href={recipe.href} target="_blank"><img src="/images/no-image.png" width="107" /></a> : <a href={recipe.href} target="_blank"><img src={recipe.thumbnail} width="107" /></a>
            }
          </Col>
          <Col md={4} sm={4} xs={4}>
            <a href={recipe.href} target="_blank" className="recipe-title">{recipe.title}</a>
            <p>{recipe.ingredients}</p>
          </Col>
        </Row>
  ))
  }
  </Row>
)

export default Recipes;
This component maps over all the recipes and displays them in separate rows. Again, I have applied a bit of custom css to it.
Next we look at the container we have in the application.
/src/containers/App.js
import React, { Component } from 'react';
import { RecipeHeader, SearchRecipe, Recipes } from '../components';
import { bindActionCreators } from 'redux';
import { connect } from 'react-redux';
import { updateRecipeName, updateRecipes } from '../actions';
import { Grid, Row, Col } from 'react-bootstrap';

class App extends Component {

  handleRecipeNameChange = (recipeName) => {
    this.props.updateRecipeName(recipeName);
  }

  handleRecipeSubmit = () => {
    const api = `http://www.recipepuppy.com/api/?q=${this.props.recipeName}`;

    // fetch the recipe api
    fetch(api, {
      method: 'GET',
    })
      .then(response => response.json())
      .then(json => {
        this.props.updateRecipes(json.results);
      })
      .catch((error) => {
        console.log('Error in fetching data');
      });
  }

  render() {
    {
      console.log(this.props);
    }
    return (
      <div>
        <RecipeHeader />
        <Grid>
          <Row>
            <Col md={12} xs={12} sm={12}>
              <SearchRecipe
      handleRecipeNameChange={this.handleRecipeNameChange}
      handleRecipeSubmit={this.handleRecipeSubmit}
      />
            </Col>
          </Row>
          <Row>
            <Col md={12} xs={12} sm={12}>
              {
      this.props.recipes !== undefined ? <Recipes recipes={this.props.recipes} /> : <div></div>
      }
            </Col>
          </Row>
        </Grid>
      </div>
    )
  }
}

function mapStateToProps(state) {
  return {
    recipeName: state.recipe.recipeName,
    recipes: state.recipe.recipes
  }
}

function mapDispatchToProps(dispatch) {
  return bindActionCreators({
    updateRecipeName: updateRecipeName,
    updateRecipes: updateRecipes
  }, dispatch);
}

export default connect(mapStateToProps, mapDispatchToProps)(App);
The handleRecipeNameChange method updates the recipe name into the store. The handleRecipeSubmit method calls the recipepuppy API with the recipe name entered by the user and updates the result set into the store. As soon as the result set from the API is updated into the store, Recipes component renders them all.
The mapDispatchToProps method allows the container to call updateRecipeName and updateRecipes actions as props. Please look at handleRecipeNameChange and handleRecipeSubmit methods.
The mapStateToProps method returns the recipe name and recipes as props. They can be accessed inside the container as this.props.recipeName and this.props.recipes.
export const UPDATE_RECIPE_NAME = 'UPDATE_RECIPE_NAME';
export const UPDATE_RECIPES = 'UPDATE_RECIPES';
The constants.js file is merely used to export the constants. The entire application is available in the git repository here: https://github.com/mashwin/recipe-finder.
I have deployed the application to surge and the url is http://recipelist.surge.sh. Please have a look and let me know your comments. Thanks !!
Comments
Post a Comment